
100 WooCommerce Tips and Tricks
Here’s 100 WooCommerce tips and tricks. Please note: we are still working on this post and have tested about 75% of the tips below. We will continue to improve this resource over the coming days and weeks WooCommerce is fast becoming the most popular e-commerce software on the web. We’ve started getting into it in a big way, offering training days and where you can learn more about it.
To help those we can’t train face to face, we decided to put together a bumper resource.
Get your free WooCommerce Cheat Sheet here
Please make sure you make any changes and tweaks on your site on a development or test site and ALWAYS have access to the FTP to your server in order to resolve issues that could break your site.
NEWS!!!!
WOOCOMMERCE BUILDER
We’ve just released a visual ‘drag and drop’ page builder for WooCommerce – click on the image below to see a walkthrough video demonstration.

Here are some links to the various sections:
Products
Checkout
My Account
Navigation & Menus
Settings
Payment Gateways
Reports
Miscellaneous
Please make sure you make any changes and tweaks on your site on a development or test site and ALWAYS have access to the FTP to your server in order to resolve issues that could break your site.
Want to remove the orderby dropdown for products?
Thanks to Zac Gordon for this tip.
To remove the drop down and ordering options completely, add the following to your functions.php file:
| remove_action( ‘woocommerce_before_shop_loop’, ‘woocommerce_catalog_ordering’, 30 ); |
view rawRemove the orderby dropdown for products hosted with
by GitHubHowever, if you want to edit the drop down and make it something else. You can find the file at the following location:
/wp-content/plugins/woocommerce/template/loops/ordering.php
You can then copy that file to your theme folder, edit it, and override the default drop down.
/wp-content/themes/yourtheme/woocommerce/loops/ordering.php
Add a border around the product description
Thank you to Amy Garrett for this one.
Modify the border size (1px, 2px, etc), style (solid, dotted, dashed) and color (#xxxxxx) to suit your needs in custom.css:
.woocommerce .woocommerce-tabs {border: 1px solid #e6e6e6}
Remove specific (or all) of the product tabs
Thank you woothemes docs for this snippet.
Use this snippet in the functions.php if you want to remove any (or all) of the product tabs, such as the description and reviews:<
| add_filter( ‘woocommerce_product_tabs’, ‘woo_remove_product_tabs’, 98 ); |
| function woo_remove_product_tabs( $tabs ) { |
| unset( $tabs[‘description’] ); // Remove the description tab |
| unset( $tabs[‘reviews’] ); // Remove the reviews tab |
| unset( $tabs[‘additional_information’] ); // Remove the additional information tab |
| return $tabs; |
| } |
view rawfunctions.php hosted with
by GitHub
Remove the ‘reviews’ tab so that only ‘product description’ appears
Thanks to Amy Garrett for this little tip.
Just add this little line of code to your custom.css file:
| .woocommerce .woocommerce-tabs ul.tabs {display:none !important} |
view rawRemove the ‘reviews’ tab so that only ‘product description’ appears hosted with
by GitHub
Add videos to your products for customers to watch
Thanks to Seb’s Studio for this one.
This simple little plugin allows you to add a Video to the Product page with an additional tab that allows your customers to view the video you embedded..simple!

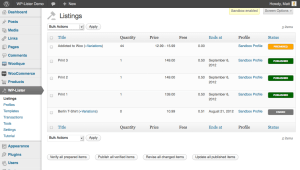
Connect your eBay store to your WooCommerce shop with ease
We give thanks to WP Lab for this little gem.
Using this easy yet flexible plugin, you can link up your eBay store with your WooCommerce shop as well as benefit from all the added features, including verifying items and getting listing fees before actually listing them.
Want to re-order the product tabs?
Thank you to the legendary woothemes for this snippet.
Change it as you want it and add to the functions.php, but here is a snippet to put the reviews first, description second and additional info third:
| add_filter( ‘woocommerce_product_tabs’, ‘woo_reorder_tabs’, 98 ); |
| function woo_reorder_tabs( $tabs ) { |
| $tabs[‘reviews’][‘priority’] = 5; // Reviews first |
| $tabs[‘description’][‘priority’] = 10; // Description second |
| $tabs[‘additional_information’][‘priority’] = 15; // Additional information third |
| return $tabs; |
| } |
view rawRe-order the product tabs hosted with
by GitHub
Create discount deals on bulk orders
Thanks to Mr Rene Puchinger for this number.
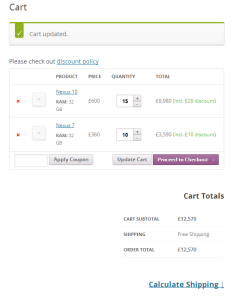
Apply bulk discounts to items in the shopping cart with the WooCommerce Bulk Discount plugin, making it super simple yet super extensive to edit it to suit your specifications. With this plugin discount can be made visible on a number of different pages or when hovering over the product in the cart as well as being easily disabled in the product options pages.WooCommerce Bulk Discount
Change the Woocommerce star ratings to show stars rather than theme ratings
We must show thanks to the Woo ninjas for this loving tutorial.

The default rating system that comes with WooCommerce is the stars, but we have disable this so that the rating system matched our themes. If you wold like to replace this with the WooCommerce default. Save the image below or get it from “plugins/WooCommerce/assets/images” and place it in your themes “images” folderThen add the following to your custom.css (if you have child theme the style.css) :
| .star-rating{float:right;width:80px;height:16px;background:url(images/star.png) repeat-x left 0} |
| .star-rating span{background:url(images/star.png) repeat-x left -32px;height:0;padding-top:16px;overflow:hidden;float:left} |
| .hreview-aggregate .star-rating{margin:10px 0 0 0} |
| #review_form #respond{position:static;margin:0;width:auto;padding:0 0 0;background:transparent none;border:0} |
| #review_form #respond:after{content:””;display:block;clear:both} |
| #review_form #respond p{margin:0 0 10px} |
| #review_form #respond .form-submit input{left:auto} |
| #review_form #respond textarea{-webkit-box-sizing:border-box;-moz-box-sizing:border-box;box-sizing:border-box;width:100%} |
| p.stars:after{content:””;display:block;clear:both} |
| p.stars span{width:80px;height:16px;position:relative;float:left;background:url(images/star.png) repeat-x left 0} |
| p.stars span a{float:left;position:absolute;left:0;top:0;width:16px;height:0;padding-top:16px;overflow:hidden} |
| p.stars span a:hover,p.stars span a:focus{background:url(images/star.png) repeat-x left -16px} |
| p.stars span a.active{background:url(images/star.png) repeat-x left -32px} |
| p.stars span a.star-1{width:16px;z-index:10} |
| p.stars span a.star-2{width:32px;z-index:9} |
| p.stars span a.star-3{width:48px;z-index:8} |
| p.stars span a.star-4{width:64px;z-index:7} |
| p.stars span a.star-5{width:80px;z-index:6} |
view rawChange the Woocommerce star ratings to show stars hosted with
by GitHubIf you’re seeing duplicate stars on your product add the css below as well:
| .star-rating span:before, ul.products li.product .product-details .star-rating:before { |
| content:none; |
| } |
view rawRemove duplicate stars on your product hosted with
by GitHub
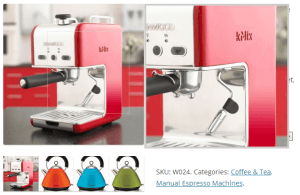
Hiding products in store that you’re not ready to sell
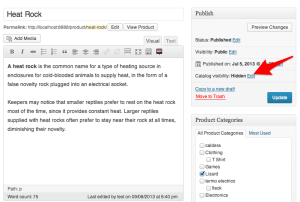
To ‘hide’ products that you don’t want customers to purchase until you’re ready, you just need to change the catalog visibility option to `hidden` on the product page:
Get rid of the ‘sort by price’ option
Thank you to the genius that is Chris Lema for this snippet.
Simply use this bit of css to hide it:
.orderby option[value="price"]{
   display: none;
}
Personalise a product tab to say exactly what you want
Thank you again to Woo docs for your generous snippet.
Add this into your functions.php making sure you replace the description tab with a custom function:
| add_filter( ‘woocommerce_product_tabs’, ‘woo_custom_description_tab’, 98 ); |
| function woo_custom_description_tab( $tabs ) { |
| $tabs[‘description’][‘callback’] = ‘woo_custom_description_tab_content’; // Custom description callback |
| return $tabs; |
| } |
view rawPersonalise a product tab to say exactly what you want hosted with
by GitHub
Show the product description underneath an image
This was courtesy of a support post on WordPress from ManusH
Add the code below to your functions.php:
| add_action(‘woocommerce_after_shop_loop_item_title’,’woocommerce_template_single_excerpt’, 5); |
view rawShow the product description underneath an image hosted with
by GitHub
Automatically add product to cart on visit
Thank you for the awesome Woo Documentation for this snippet.
If you want to automatically add a product to cart on visit, add this to your functions.php (or custom plugin):
| * goes in theme functions.php or a custom plugin |
| // add item to cart on visit |
| add_action( ‘init’, ‘add_product_to_cart’ ); |
| function add_product_to_cart() { |
| if ( ! is_admin() ) { |
| global $woocommerce; |
| $product_id = 64; |
| $found = false; |
| //check if product already in cart |
| if ( sizeof( $woocommerce->cart->get_cart() ) > 0 ) { |
| foreach ( $woocommerce->cart->get_cart() as $cart_item_key => $values ) { |
| $_product = $values[‘data’]; |
| if ( $_product->id == $product_id ) |
| $found = true; |
| } |
| // if product not found, add it |
| if ( ! $found ) |
| $woocommerce->cart->add_to_cart( $product_id ); |
| } else { |
| // if no products in cart, add it |
| $woocommerce->cart->add_to_cart( $product_id ); |
| } |
| } |
| } |
view rawAutomatically add product to cart on visit hosted with
by GitHub
Remove product content based on the category
All hail Woo Docs for your awesome snippet.
Add the following to your themes functions.php file to e.g: remove product imagery on products within the ‘Cookware’ category. Replace the category in the snippet as required:
| add_action( ‘wp’, ‘remove_product_content’ ); |
| function remove_product_content() { |
| // If a product in the ‘Cookware’ category is being viewed… |
| if ( is_product() && has_term( ‘Cookware’, ‘product_cat’ ) ) { |
| //… Remove the images |
| remove_action( ‘woocommerce_before_single_product_summary’, ‘woocommerce_show_product_images’, 20 ); |
| // For a full list of what can be removed please see woocommerce-hooks.php |
| } |
| } |
view rawRemove product content based on the category hosted with
by GitHub
Don’t want products from a particular category to show on the shop page?
Thanks to wptaskforce for this tweak.
Hide products that are packages or subscription which belong to a page or has its own page by adding this into your functions.php:
| add_action( ‘pre_get_posts’, ‘custom_pre_get_posts_query’ ); |
| function custom_pre_get_posts_query( $q ) { |
| if ( ! $q->is_main_query() ) return; |
| if ( ! $q->is_post_type_archive() ) return; |
| if ( ! is_admin() ) { |
| $q->set( ‘tax_query’, array(array( |
| ‘taxonomy’ => ‘product_cat’, |
| ‘field’ => ‘slug’, |
| ‘terms’ => array( ‘PUT YOUR CATEGORY HERE’ ), // Don’t display products in the membership category on the shop page . For multiple category , separate it with comma. |
| ‘operator’ => ‘NOT IN’ |
| ))); |
| } |
| remove_action( ‘pre_get_posts’, ‘custom_pre_get_posts_query’ ); |
| } |
view rawRemove products from a particular category to show on the shop page hosted with
by GitHub
Change the number of related products displayed in your shop
Thanks to True Themes for this one.
Customise the number of rows and the number of products in each row with this little snippet. Change the number of related products displayed within your WooCommerce Shop by adding the following code to the end of your functions.php (Important: “?>” should be the last bit of code within functions.php)
| // Redefine woocommerce_output_related_products() |
| function woocommerce_output_related_products() { |
| woocommerce_related_products(4,2); // Display 4 products in rows of 2 |
| } |
view rawChange the number of related products displayed in your shop hosted with
by GitHubPlease Note: – 4 is for the number of products in each row. – 2 is for the number of rows.
Customise the number of columns and products displayed per page
Thanks to Woo Docs and James Koster for your awesome tips and plugin.
To alter the number of products displayed per page, add this little snippet:
| // Display 24 products per page. Goes in functions.php |
| add_filter( ‘loop_shop_per_page’, create_function( ‘$cols’, ‘return 24;’ ), 20 ); |
view rawCustomise the number of columns and products displayed per page hosted with
by GitHub
Alternatively if you want to change the number to columns as well as the number of products per page, this plugin will do just the job:
WooCommerce Product Archive Customiser
Customers get to choose a delivery date
Thank you Ashok Rane of Tyche Softwares for this great plugin.
Use this useful too to allow your customers to choose an order delivery date on the checkout page which will then show up to the site administrator on the “Custom Fields” section.
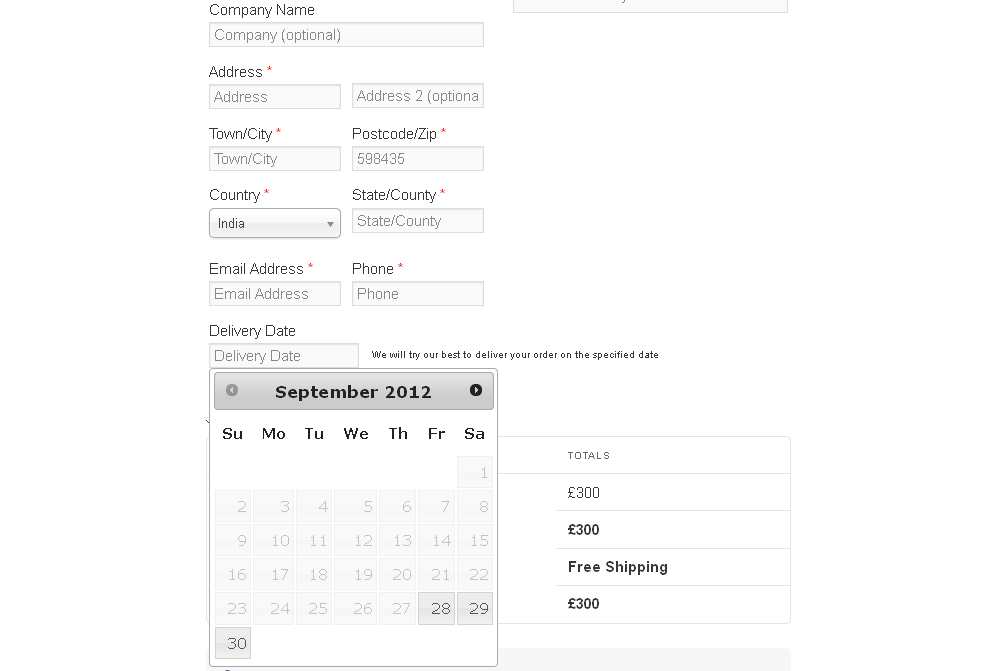
Order Delivery Date for Woocommerce
If your products are not inclusive of VAT, this useful tip will allow “+VAT” to be added after a product price so customers are clear on the price
Thanks to WordPress support for this one.
Woocommerce needs two files to be changed to allow the display of “+vat” or whichever sales tax needs to be applied. First you need to control the appearance on the actual product details in /woocommerce/single-product/price.php :
Change<p itemprop="price"><?php echo $product->get_price_html(); ?> + vat</p>
to<p itemprop="price"><?php echo $product->get_price_html(); ?><strong> + vat</strong></p>
Then you need to control how the price appears everywhere else in /woocommerce/loop/price.php :
Change<span><?php echo $price_html; ?></span>
to<span><?php echo $price_html; ?> + vat</span>
Hide the product count next to the category name – e.g. MyCategory(25)
Thank you Amy Garrett for this tip.
Add the code into custom.css:

.count {display:none !important}
‘Cut out the middle man’ and send customers straight to cart
We are forever in your debt Chris Lema for your knowledge!
When your customers are using WooCommerce it is set to navigate them from the shop page, to the product detail page, and from there to the cart page. To ‘get rid of a click’ and send them straight to the checkout this tutorial will take you through it step by step and not just with a hook that only works from a sing product page. It’s definately worth a look!
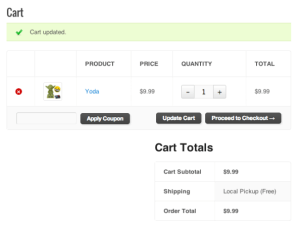
Give yourself some space in the Cart
Thank you Teach Web 101 for this one.
If the cart too far right and everything is too crammed together you can use this snippet just to give you a little bit of spacing:
.cart-collaterals .cart_totals, .cart-collaterals .shipping_calculator, .cart-collaterals .cross-sells {width: 75%; float: right}
Automatically mark orders as ‘complete’
Thank you to Sky Verge for this great snippet.
By default, virtual-downloadable orders are marked as ‘completed’ after successful payment, but if you want to be able to automatically mark a virtual order as complete upon payment (for instance in the case of a site which takes donations where no further action is required) you can use the following code in your functions.php:
| add_filter( ‘woocommerce_payment_complete_order_status’, ‘virtual_order_payment_complete_order_status’, 10, 2 ); |
| function virtual_order_payment_complete_order_status( $order_status, $order_id ) { |
| $order = new WC_Order( $order_id ); |
| if ( ‘processing’ == $order_status && |
| ( ‘on-hold’ == $order->status || ‘pending’ == $order->status || ‘failed’ == $order->status ) ) { |
| $virtual_order = null; |
| if ( count( $order->get_items() ) > 0 ) { |
| foreach( $order->get_items() as $item ) { |
| if ( ‘line_item’ == $item[‘type’] ) { |
| $_product = $order->get_product_from_item( $item ); |
| if ( ! $_product->is_virtual() ) { |
| // once we’ve found one non-virtual product we know we’re done, break out of the loop |
| $virtual_order = false; |
| break; |
| } else { |
| $virtual_order = true; |
| } |
| } |
| } |
| } |
| // virtual order, mark as completed |
| if ( $virtual_order ) { |
| return ‘completed’; |
| } |
| } |
| // non-virtual order, return original status |
| return $order_status; |
| } |
view rawAutomatically mark orders as ‘complete’ in WooCommerce hosted with
by GitHub
Add a checkbox field to checkout with a simple snippet
This snippet can also be found at gist.github.com
To add a simple checkbox field to you checkout, add this to your functions.php:
| <?php |
| /** |
| * Add checkbox field to the checkout |
| **/ |
| add_action(‘woocommerce_after_order_notes’, ‘my_custom_checkout_field’); |
| function my_custom_checkout_field( $checkout ) { |
| echo ‘<div id=”my-new-field”><h3>’.__(‘My Checkbox: ‘).'</h3>’; |
| woocommerce_form_field( ‘my_checkbox’, array( |
| ‘type’ => ‘checkbox’, |
| ‘class’ => array(‘input-checkbox’), |
| ‘label’ => __(‘I have read and agreed.’), |
| ‘required’ => true, |
| ), $checkout->get_value( ‘my_checkbox’ )); |
| echo ‘</div>’; |
| } |
| /** |
| * Process the checkout |
| **/ |
| add_action(‘woocommerce_checkout_process’, ‘my_custom_checkout_field_process’); |
| function my_custom_checkout_field_process() { |
| global $woocommerce; |
| // Check if set, if its not set add an error. |
| if (!$_POST[‘my_checkbox’]) |
| $woocommerce->add_error( __(‘Please agree to my checkbox.’) ); |
| } |
| /** |
| * Update the order meta with field value |
| **/ |
| add_action(‘woocommerce_checkout_update_order_meta’, ‘my_custom_checkout_field_update_order_meta’); |
| function my_custom_checkout_field_update_order_meta( $order_id ) { |
| if ($_POST[‘my_checkbox’]) update_post_meta( $order_id, ‘My Checkbox’, esc_attr($_POST[‘my_checkbox’])); |
| } |
| ?> |
view rawgistfile1.aw hosted with
by GitHub
Want to alter the default state and country at the checkout?
All hail the awesome Woothemes documentation for this one.
To change the default state and country on the checkout simply add this line of css to your functions.php file:
| /** |
| * Manipulate default state and countries |
| * |
| * As always, code goes in your theme functions.php file |
| */ |
| add_filter( ‘default_checkout_country’, ‘change_default_checkout_country’ ); |
| add_filter( ‘default_checkout_state’, ‘change_default_checkout_state’ ); |
| function change_default_checkout_country() { |
| return ‘XX’; // country code |
| } |
| function change_default_checkout_state() { |
| return ‘XX’; // state code |
| } |
view rawAlter the default state and country at the checkout hosted with
by GitHub
Automatically complete orders
Thank you Woo Docs for this one.
Automatically mark orders for virtual products as Completed after a successful payment by adding this snippet into your functions.php:
| /** |
| * Auto Complete all WooCommerce orders. |
| * Add to theme functions.php file |
| */ |
| add_action( ‘woocommerce_thankyou’, ‘custom_woocommerce_auto_complete_order’ ); |
| function custom_woocommerce_auto_complete_order( $order_id ) { |
| global $woocommerce; |
| if ( !$order_id ) |
| return; |
| $order = new WC_Order( $order_id ); |
| $order->update_status( ‘completed’ ); |
| } |
view rawAutomatically complete orders in WooCommerce hosted with
by GitHub
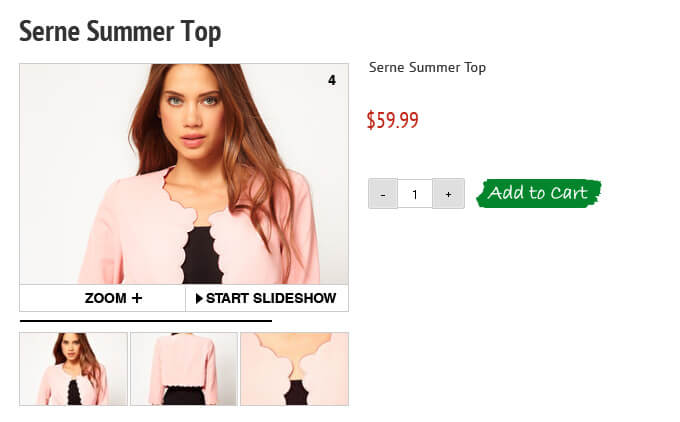
Customise ‘add to cart’ text on single product pages
Thanks to the awesome Remi Corson at wpexplorer for this snippet.
Add the following to your functions.php file replacing ‘my button text’ with whatever you want it to say:
| add_filter( ‘add_to_cart_text’, ‘woo_custom_cart_button_text’ ); // < 2.1 |
| add_filter( ‘woocommerce_product_single_add_to_cart_text’, ‘woo_custom_cart_button_text’ ); // 2.1 + |
| function woo_custom_cart_button_text() { |
| return __( ‘My Button Text’, ‘woocommerce’ ); |
| } |
view rawCustomise ‘add to cart’ text on single product pages in WooCommerce hosted with
by GitHub
Change the ‘add to cart’ text on product archives
Thank you for this snippet Woothemes.
Add the following to your functions.php file:
| add_filter( ‘add_to_cart_text’, ‘woo_custom_cart_button_text’ ); // < 2.1 |
| add_filter( ‘woocommerce_product_add_to_cart_text’, ‘woo_custom_cart_button_text’ ); // 2.1 + |
| function woo_custom_cart_button_text() { |
| return __( ‘My Button Text’, ‘woocommerce’ ); |
| } |
view rawfunctions.php hosted with
by GitHub
Show cart contents/total
We are forever in your debt Woothemes for this snippet.
To display the cart contents and total in your template use something like:
| <a class=”cart-contents” href=”<?php echo wc_get_cart_url(); ?>” title=”<?php _e( ‘View your shopping cart’ ); ?>”><?php echo sprintf ( _n( ‘%d item’, ‘%d items’, WC()->cart->get_cart_contents_count() ), WC()->cart->get_cart_contents_count() ); ?> – <?php echo WC()->cart->get_cart_total(); ?></a> |
view rawgistfile1.php hosted with
by GitHub
To ajaxify your cart viewer so it updates when an item is added (via ajax) use:
| <?php |
| // Ensure cart contents update when products are added to the cart via AJAX (place the following in functions.php) |
| add_filter( ‘woocommerce_add_to_cart_fragments’, ‘woocommerce_header_add_to_cart_fragment’ ); |
| function woocommerce_header_add_to_cart_fragment( $fragments ) { |
| ob_start(); |
| ?> |
| <a class=”cart-contents” href=”<?php echo wc_get_cart_url(); ?>” title=”<?php _e( ‘View your shopping cart’ ); ?>”><?php echo sprintf (_n( ‘%d item’, ‘%d items’, WC()->cart->get_cart_contents_count() ), WC()->cart->get_cart_contents_count() ); ?> – <?php echo WC()->cart->get_cart_total(); ?></a> |
| <?php |
| $fragments[‘a.cart-contents’] = ob_get_clean(); |
| return $fragments; |
| } |
view rawgistfile1.php hosted with
by GitHub
Empty shopping cart?
Thank you for sharing this one Chris Lema.
Sometimes because of caching your shopping cart will appear empty even when you have added an item. To resolve this you need to make sure your page is never cached! Find out more from Chris Lema’s tutorial.
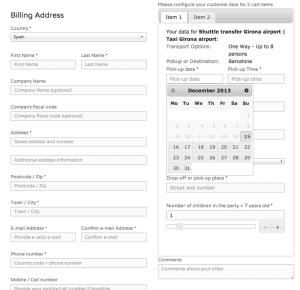
Make managing orders more reliable by adding a ‘confirm email address’ field to checkout page
Thanks to Hugh Lashbroke for this handy little plugin.
To ensure customers enter their correct email address you can add an extra ‘confirm email address’ field to your checkout you with this simple but useful WooCommerce Email Validation plugin.
Manage your WooCommerce checkout including adding new fields to the checkout page, re-ordering fields and more
Thanks goes to TrottyZone for this one.
‘WooCommerce Checkout Manager’ is a powerful plugin for overall management of your checkout page. It has a vast amount of capabilities to manage your products on checkout such as adding fields, removing fields that you do not need, removing the required attribute rendering the field optional to customer or even perhaps adding more fields to the checkout page.
Hide the coupon form on the cart or checkout page to encourage a steamlined order process
Thank you sellwithwp for this code.
Hiding the coupon form or renaming the coupon field can help discourage your customers to go on a ‘coupon hunt’ when reaching the checkout upon ordering. Use this snippet to simply disable the form on the cart/checkout pages, but leave coupon use enabled otherwise:
| <?php |
| // hide coupon form everywhere |
| function hide_coupon_field( $enabled ) { |
| if ( is_cart() || is_checkout() ) { |
| $enabled = false; |
| } |
| return $enabled; |
| } |
| add_filter( ‘woocommerce_coupons_enabled’, ‘hide_coupon_field’ ); |
view rawwc-hide-coupons.php hosted with
by GitHub
Alternatively, to rename it you simply change the text inside the single quotes to whatever you’d like the “Apply Coupon” button to say when using this code:
| <?php |
| // rename the coupon field on the cart page |
| function woocommerce_rename_coupon_field_on_cart( $translated_text, $text, $text_domain ) { |
| // bail if not modifying frontend woocommerce text |
| if ( is_admin() || ‘woocommerce’ !== $text_domain ) { |
| return $translated_text; |
| } |
| if ( ‘Apply Coupon’ === $text ) { |
| $translated_text = ‘Apply Promo Code’; |
| } |
| return $translated_text; |
| } |
| add_filter( ‘gettext’, ‘woocommerce_rename_coupon_field_on_cart’, 10, 3 ); |
view rawwc-rename-cart-coupon-field.php hosted with
by GitHub
Encourage people to register on your site by adding a message above the login/registration form
Thank you James Koster for this great tip.
List the benefits of registering on your site above the login form by adding this to your child themes functions.php:
| add_action( ‘woocommerce_before_customer_login_form’, ‘jk_login_message’ ); |
| function jk_login_message() { |
| if ( get_option( ‘woocommerce_enable_myaccount_registration’ ) == ‘yes’ ) { |
| ?> |
| <div class=”woocommerce-info”> |
| <p><?php _e( ‘Returning customers login. New users register for next time so you can:’ ); ?></p> |
| <ul> |
| <li><?php _e( ‘View your order history’ ); ?></li> |
| <li><?php _e( ‘Check on your orders’ ); ?></li> |
| <li><?php _e( ‘Edit your addresses’ ); ?></li> |
| <li><?php _e( ‘Change your password’ ); ?></li> |
| </ul> |
| </div> |
| <?php |
| } |
| } |
view rawfunctions.php hosted with
by GitHub
Give yourself some extra width in the address fields
Thanks to Woothemes documentation for this one.
Make address fields wider with this snippet:
add_filter('woocommerce_billing_fields', 'custom_woocommerce_billing_fields');
function custom_woocommerce_billing_fields( $fields ) {
$fields['billing_address_1']['class'] = array( 'form-row-wide' );
$fields['billing_address_2']['class'] = array( 'form-row-wide' );
return $fields;
}
Ensure your customers are completing the checkout fields
Thank you Remi at WPexplorer for this.
Make the checkout fields required with this little bit of css:
add_filter( 'woocommerce_checkout_fields', 'woo_filter_account_checkout_fields' );
function woo_filter_account_checkout_fields( $fields ) {
$fields['account']['account_username']['required'] = true;
$fields['account']['account_password']['required'] = true;
$fields['account']['account_password-2']['required'] = true;
return $fields;
}
Display My Account link in a template file to let users know if they are logged in or not
Thanks Woothemes for this snippet.
Using this code you can display a link to the user account section. If the user is not logged in the link will display ‘Login / Register’ and take the use to the login / signup page. If the user is logged in the link will display ‘My account’ and take them directly to their account:
| <?php if ( is_user_logged_in() ) { ?> |
| <a href=”<?php echo get_permalink( get_option(‘woocommerce_myaccount_page_id’) ); ?>” title=”<?php _e(‘My Account’,’woothemes’); ?>”><?php _e(‘My Account’,’woothemes’); ?></a> |
| <?php } |
| else { ?> |
| <a href=”<?php echo get_permalink( get_option(‘woocommerce_myaccount_page_id’) ); ?>” title=”<?php _e(‘Login / Register’,’woothemes’); ?>”><?php _e(‘Login / Register’,’woothemes’); ?></a> |
| <?php } ?> |
view rawheader.php hosted with
by GitHub
Create new fields on the registration page which will then automatically link with the billing address
Thank you Flemming Bækdal for this useful tutorial.
When adding a field on the registration page the information does not automatically link with the billing address. This tutorial takes you step by step through how to make this link whilst visually being able to see how it’s done too.

Create new fields on the WooCommerce registration page tutorial
Replace the add to cart button on product archive (shop) page with a button that links to each product page
Thanks to our own Nick Burne for this one!
This is if you want to replace the Add to cart button on the WooCommerce product archive page (shop page) with a normal button that links to the single product page for each product. The reason for this might be because potential customers have not yet seen the product page and you want them to visit that first. Read this on our blog here.
Center your logo
Thanks to Tech Web 101 for this one.
To center your logo change, place this code into your custom.css: adjusting the width to the exact width of your logo image:
#logo {float: none; margin: 0 auto; width:764px}
Remove the sidebar and make all your pages full width
Thanks to the people who posted this as a support issue on WordPress Support for this!
To hide the sidebar with code you can pop this into your custom.css:
.woocommerce #sidebar{display:none}
Or you could delete the sidebar completely:
| <?php get_header(); ?> |
| <div id=”container”> |
| <div id=”content-wrap”> |
| <?php woocommerce_content(); ?> |
| </div> |
| </div> |
| <?php get_footer(); ?> |
view rawDelete the sidebar in WooCommerce hosted with
by GitHub
Or you could take the sidebar out simply by commenting out the information in the woocommerce/templates/shop/sidebar.php file so that you can ‘bring it back’ at a later date. Simply put a /* and */ around everything there and it will take it out.
Customise the ‘Home’ text to say whatever you’d like
Thank you WooThemes for this snippet.
Add this in your theme/child themes functions.php file replacing the ‘Appartment’ with your text:
add_filter( 'woocommerce_breadcrumb_defaults', 'jk_change_breadcrumb_home_text' );
function jk_change_breadcrumb_home_text( $defaults ) {
// Change the breadcrumb home text from 'Home' to 'Appartment'
$defaults['home'] = 'Appartment';
return $defaults;
}
Change the Home link to a different URL
Thank you WooThemes for your awesome documentation.
Add this in your theme/child themes functions.php file replacing the web address with the URL of your choice:
add_filter( 'woocommerce_breadcrumb_home_url', 'woo_custom_breadrumb_home_url' );
function woo_custom_breadrumb_home_url() {
return 'http://woothemes.com';
}
Get rid of all the breadcrumbs
We are super grateful to the awesome WooThemes team for this.
Add this in your theme/child themes functions.php file:
| add_action( ‘init’, ‘jk_remove_wc_breadcrumbs’ ); |
| function jk_remove_wc_breadcrumbs() { |
| remove_action( ‘woocommerce_before_main_content’, ‘woocommerce_breadcrumb’, 20, 0 ); |
| } |
view rawfunctions.php hosted with
by GitHub
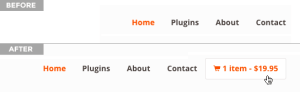
Automatically display a shopping cart in your menu bar and more!
Thank you to the developers at WP OVernight.
Display a shopping cart in your menu bar with this quick ‘one minute install’ plugin as well as utilising the other tweaks such as ‘Float left, float right, or use your menu’s default settings’ or ‘Display items only, price only, or both’
Add WooCommerce specific URLs to the WordPress menu
Thank you Remi Corson for this handy tutorial.
To add WooCommerce pages URLs to your WordPress main menu, simply go to Appearance > Menus in the WordPress main menu. Click on the links section. Add custom URLs using the “my account” page slug and the endpoints values, and hit the add to menu button. For full details and screenshots click here.
Replace the old page navigation with fancier pagination links
Our thanks go to Lester Chan and Scribu and WPSnacks for this.
This plugin will help to create a cleaner pagination page navigation. You can also find some styling tips for this plugin at ThemeShaper.
If you need to then manually replace the WooCommerce default page navigation then add this code to your current themes functions.php file:
/**
* Replace WooCommerce Default Pagination with WP-PageNavi Pagination
*
* @author WPSnacks.com
* @link http://www.wpsnacks.com
*/
remove_action('woocommerce_pagination', 'woocommerce_pagination', 10);
function woocommerce_pagination() {
wp_pagenavi();
}
add_action( 'woocommerce_pagination', 'woocommerce_pagination', 10);

Hide the RSS link in the primary navigation
Thank you Tech Web 101 for this one.
Get rid of the RSS link in the primary navigation with this short bit of code:

#navigation ul.rss {display:none !important}
#navigation ul.rss.cart-enabled {display:none !important}
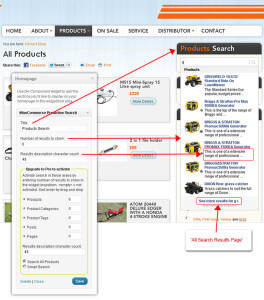
Customise the search results by post type
Thank you to the brilliant WooThemes Ninjas for this tutorial and plugin.
Attach the following code snippet to the bottom of your theme’s functions.php file:
// Set search results to display only 'product' post type results
if ( !is_admin() ) {
function searchfilter($query) {
 if ($query->is_search && !is_admin() ) {
 $query->set('post_type',array('product'));
 }
return $query;
}
add_filter('pre_get_posts','searchfilter');
}
Notice that the key argument is ‘product’. You can use the following keys to determine which type of posts to display:
- ‘product’ = Products
- ‘post’ = Posts (blog articles)
- ‘page’ = Static pages
You can include multiple post types by setting the arguments:
$query->set('post_type',array('product','page'));
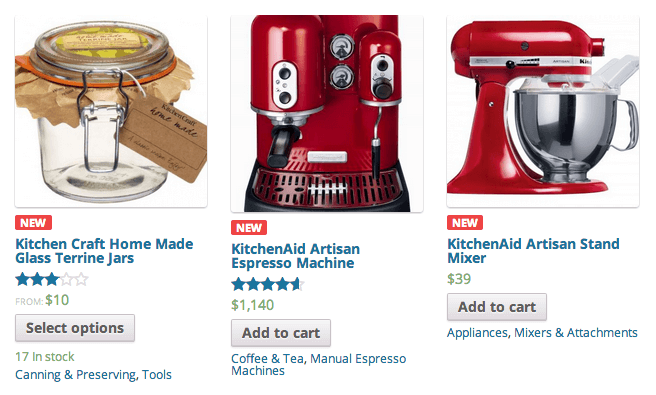
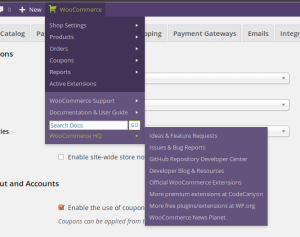
You can also use this with any other custom post type your site uses – for example, if you had the Projects by WooThemes plugin, you could use ‘project’ to filter by Projects. You can see how to find your post type in the image below:
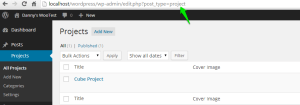
Keep in mind that this is a site-wide effect. This will not impact search results done through your WordPress dashboard, only front-end searches. To remove, simply comment out the code or remove it from your functions.php file.
Want to customise the currency or symbol?
Thank you to Remi at WPExplorer for this tip.
Paste this code in your theme functions.php file and swap out the currency code and symbol with your own:
add_filter( 'woocommerce_currencies', 'add_my_currency' );
function add_my_currency( $currencies ) {
$currencies['ABC'] = __( 'Currency name', 'woocommerce' );
return $currencies;
}
add_filter('woocommerce_currency_symbol', 'add_my_currency_symbol', 10, 2);
function add_my_currency_symbol( $currency_symbol, $currency ) {
switch( $currency ) {
case 'ABC': $currency_symbol = '$'; break;
}
return $currency_symbol;
}
Get rid of, or simply unhook WooCommerce Emails
Woo themes documentation receives our thanks for this.
If you don’t want WooCommerce Emails simply pop this code into your functions.php:
| /** |
| * Code goes in functions.php or a custom plugin. |
| */ |
| add_action( ‘woocommerce_email’, ‘unhook_those_pesky_emails’ ); |
| function unhook_those_pesky_emails( $email_class ) { |
| /** |
| * Hooks for sending emails during store events |
| **/ |
| remove_action( ‘woocommerce_low_stock_notification’, array( $email_class, ‘low_stock’ ) ); |
| remove_action( ‘woocommerce_no_stock_notification’, array( $email_class, ‘no_stock’ ) ); |
| remove_action( ‘woocommerce_product_on_backorder_notification’, array( $email_class, ‘backorder’ ) ); |
| // New order emails |
| remove_action( ‘woocommerce_order_status_pending_to_processing_notification’, array( $email_class->emails[‘WC_Email_New_Order’], ‘trigger’ ) ); |
| remove_action( ‘woocommerce_order_status_pending_to_completed_notification’, array( $email_class->emails[‘WC_Email_New_Order’], ‘trigger’ ) ); |
| remove_action( ‘woocommerce_order_status_pending_to_on-hold_notification’, array( $email_class->emails[‘WC_Email_New_Order’], ‘trigger’ ) ); |
| remove_action( ‘woocommerce_order_status_failed_to_processing_notification’, array( $email_class->emails[‘WC_Email_New_Order’], ‘trigger’ ) ); |
| remove_action( ‘woocommerce_order_status_failed_to_completed_notification’, array( $email_class->emails[‘WC_Email_New_Order’], ‘trigger’ ) ); |
| remove_action( ‘woocommerce_order_status_failed_to_on-hold_notification’, array( $email_class->emails[‘WC_Email_New_Order’], ‘trigger’ ) ); |
| // Processing order emails |
| remove_action( ‘woocommerce_order_status_pending_to_processing_notification’, array( $email_class->emails[‘WC_Email_Customer_Processing_Order’], ‘trigger’ ) ); |
| remove_action( ‘woocommerce_order_status_pending_to_on-hold_notification’, array( $email_class->emails[‘WC_Email_Customer_Processing_Order’], ‘trigger’ ) ); |
| // Completed order emails |
| remove_action( ‘woocommerce_order_status_completed_notification’, array( $email_class->emails[‘WC_Email_Customer_Completed_Order’], ‘trigger’ ) ); |
| // Note emails |
| remove_action( ‘woocommerce_new_customer_note_notification’, array( $email_class->emails[‘WC_Email_Customer_Note’], ‘trigger’ ) ); |
| } |
view rawgistfile1.txt hosted with
by GitHub
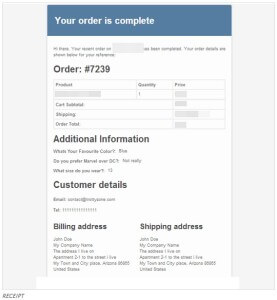
How to add any custom field to your order emails by hooking in and specifying the name of the custom field
Another thank you in the list to the documentation at WooThemes.
Copy the following code to your theme functions.php then go to WooCommerce > Checkout Fields to add your newly created custom field.
| /** |
| * Add the field to order emails |
| **/ |
| add_filter(‘woocommerce_email_order_meta_keys’, ‘my_woocommerce_email_order_meta_keys’); |
| function my_woocommerce_email_order_meta_keys( $keys ) { |
| $keys[‘How did you hear about us?’] = ‘hear_about_us’; |
| return $keys; |
| } |
view rawgistfile1.php hosted with
by GitHub
Here is a screenshot example of adding in the custom field ‘How did you hear about us’:
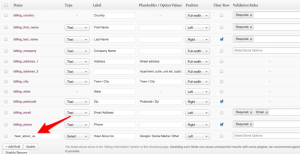
Using this example the code would be:
$keys['How did you hear about us?'] = 'hear_about_us';
Customise a URL to direct customers to from ‘add to cart’
Our snippet here came from the awesome WooThemes.
Set a custom add to cart URL to redirect to by adding the following code to the file functions.php:
add_filter('add_to_cart_redirect', 'custom_add_to_cart_redirect');

function custom_add_to_cart_redirect() {
     return get_permalink(get_option('woocommerce_checkout_page_id')); // Replace with the url of your choosing
}
Change the look of your product gallery by customising the number of thumbnails per row
WooThemes we give you thanks again for this.
Change number of thumbnails per row in product galleries by simply adding this code replacing the number of thumbnails per row with the ‘xx’:
add_filter ( 'woocommerce_product_thumbnails_columns', 'xx_thumb_cols' );
 function xx_thumb_cols() {
     return 4; // .last class applied to every 4th thumbnail
 }
Edit the ‘out of stock’ with any text you prefer
WPExplorer we thank you for this lovely little tip.
Add this code to edit the ‘out of stock’ text with your own customisation. Here it has been replaced with ‘sold’:
add_filter('woocommerce_get_availability', 'availability_filter_func');
function availability_filter_func($availability)
{
$availability['availability'] = str_ireplace('Out of stock', 'Sold', $availability['availability']);
return $availability;
}
Add in your own alternative “from” email address
Again we thank WPExplorer for this one.
Use this code to change the ‘from’ email address to any other of your choice. Just replace your own with ‘your@email.com’:
function woo_custom_wp_mail_from() {
global $woocommerce;
return html_entity_decode( 'your@email.com' );
}
add_filter( 'wp_mail_from', 'woo_custom_wp_mail_from', 99 );
This trick will allow you to order by price, date or title on your shop page
Thank you Remi for sharing this on WPExplorer.
add_filter('woocommerce_default_catalog_orderby', 'custom_default_catalog_orderby');
function custom_default_catalog_orderby() {
return 'date'; // Can also use title and price
}
Want to change how many columns you have in your shop?
Thank you to this tip from WPExplorer.
To change the shop column number simply add in this code (note: using this exact code will alter it to 4 columns):
* WooCommerce Extra Feature
* --------------------------
*
* Change product columns number on shop pages
*
*/
function woo_product_columns_frontend() {
global $woocommerce;
// Default Value also used for categories and sub_categories
$columns = 4;
// Product List
if ( is_product_category() ) :
$columns = 4;
endif;
//Related Products
if ( is_product() ) :
$columns = 2;
endif;
//Cross Sells
if ( is_checkout() ) :
$columns = 4;
endif;
return $columns;
}
add_filter('loop_shop_columns', 'woo_product_columns_frontend');
Experience seamless Paypal transactions with this thoroughly tested plugin brought to you by experienced PayPal developers
Thank you to Angel EYE for this great plugin.
Integrate PayPal Express Checkout and Payments Pro into the WooCommerce shopping cart to ensure payments are processed correctly and includes all WooCommerce order data in PayPal transactions so that everything matches in both places.
Add payment type to WooCommerce admin email
Thanks to Gerhard Potgieter for this useful trick.
It may be useful on order emails to include the payment type as some WooCommerce store admins would perhaps want to know this data in emails for decisions on whether to ship items immediately or to hold off for a while for money to clear. To add in payment types simply add in this code to your functions.php:
add_action( 'woocommerce_email_after_order_table',
'add_payment_method_to_admin_new_order', 15, 2 );
function add_payment_method_to_admin_new_order( $order, $is_admin_email ) {
 if ( $is_admin_email ) {
 echo '<p><strong>Payment Method:</strong> ' . $order->payment_method_title .
'</p>';
}
}
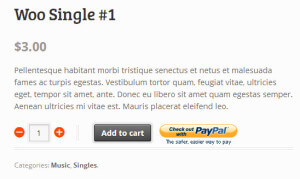
Replace default paypal logo with your own chosen image
Our thanks go to Isabel Castillo for this.
If you only accept credit card payments via PayPal, then you will only have the default PayPal icon displayed. WooCommerce does not display credit card icons (even if you accept them through paypal) for PayPal by default. Here is how you can change WooCommerce’s default PayPal icon remembering that you must replace the image filename and path with your own image:/*** Custom icon for PayPal payment option on WooCommerce checkout page.*/functionisa_extended_paypal_icon() {// picture of accepted credit card icons for PayPal paymentsreturnget_bloginfo('template_directory').'/images/paypal-payments.jpg';}add_filter( 'woocommerce_paypal_icon', 'isa_extended_paypal_icon');
Hide all other shipping methods when free shipping is available
Thank you WooThemes for this one in your documentation.
Free shipping!? If you are offering free shipping and want to hide the other shipping methods you can do this by putting this into your functions.php:
| /** |
| * woocommerce_package_rates is a 2.1+ hook |
| */ |
| add_filter( ‘woocommerce_package_rates’, ‘hide_shipping_when_free_is_available’, 10, 2 ); |
| /** |
| * Hide shipping rates when free shipping is available |
| * |
| * @param array $rates Array of rates found for the package |
| * @param array $package The package array/object being shipped |
| * @return array of modified rates |
| */ |
| function hide_shipping_when_free_is_available( $rates, $package ) { |
| // Only modify rates if free_shipping is present |
| if ( isset( $rates[‘free_shipping’] ) ) { |
| // To unset a single rate/method, do the following. This example unsets flat_rate shipping |
| unset( $rates[‘flat_rate’] ); |
| // To unset all methods except for free_shipping, do the following |
| $free_shipping = $rates[‘free_shipping’]; |
| $rates = array(); |
| $rates[‘free_shipping’] = $free_shipping; |
| } |
| return $rates; |
| } |
view rawgistfile1.php hosted with
by GitHub
Inform your customers which payment methods are accepted on your store before they reach the checkout with the WooCommerce Accepted Payment Methods plugin
Thank you James Koster for developing this great plugin.
Display accepted payment methods via widget, shortcode or template tag using this simple but effective plugin.

WooCommerce Accepted Payments Methods
Disable a Payment Gateway for a Specific Country or enable a gateway for a specific country
Thank you Camp Bloomer for this tutorial.
If you trade internationally it is common to need to disable PayPal for non-locals or enable a specific gateway for a specific country only. Follow the steps in this simple tutorial which will walk you through disabling or enabling a payment gateway:
Disable a payment gateway tutorial
Sign up to simplify Commerce by MasterCard by 30th April for FREE and benefit from the low, flat rate fees with no hidden charges
Thank you to WooThemes for providing this one.
Get yourself a a merchant account and payment gateway in a single, secure package that takes just a few minutes to set up with Simplify Commerce by Mastercard from WooThemes. There are no hidden fees or monthly costs and you can enjoy the peace of mind of knowing your transactions are secure.
Get Simplify commerce by MasterCard payment extension for FREE before the 30th of April 2014!

Simplify Commerce by MasterCard
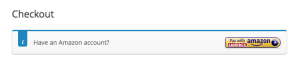
Provide customers with the ease of connecting up and paying with their Amazon accounts in an easy and secure way
Thanks for this one WooThemes.
Give customers the added ease of making a payment through their Amazon account with this free payment gateway which is embedded directly into your existing WooCommerce site. All the buyer interactions with Amazon Payments Advanced take place in embedded widgets so that the buyer never leaves your site.
Give your customers a full service payment provider with this all-in-one solution from Novalnet
Thank you Novalnet for this one.
Allow your customers the option of paying with Credit card, Direct debit, Prepayment, Payment by invoice, Instant bank transfer, PayPal and iDEAL with this WooCommerce Payment Gateway by Novalnet – the number one leading all service provider.
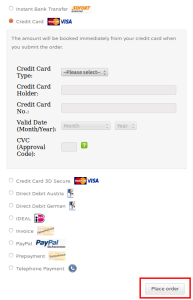
WooCommerce Payment Gateway by Novalnet
When you’re all ready to go how do you test that payments are going through before launching live?
Thank you ClickWP for this really useful tutorial.
So you’ve loaded all your products and you’re ready to launch your site – but how do you know the paypal payments will work as you expect them to? The solution – Paypal sandbox. Paypal sandbox provides you with a test paypal account that you can use to order and check payments are going through. This simple step-by-step guide takes you through the process clearly from beginning to end.
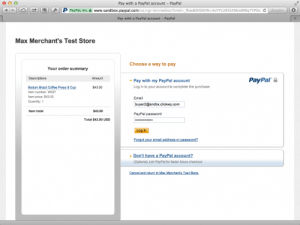
Test payments in WooCommerce with the PayPal Sandbox tutorial
Create, print & automatically email PDF invoices & packing slips for your orders using a template or a customised one of your own
Thank you Ewout for this.
‘Woocommerce PDF invoices and packing slips’ is a fully customisable plugin which allows you to create invoices and packing slips in PDF. This plugin is a fantastic add-on to your WooCommerce store which also allows you to benefit from some great key features such automatically attaching PDF invoices to order confirmation emails and allowing customers to download their invoices from the My Account page.
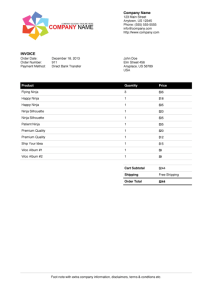
WooCommerce PDF Invoices and Packing Slips
Add useful admin links and resources to the WordPress Toolbar / Admin Bar with this lightweight plugin that packs a ‘heavy punch’
Thanks to Deckerweb for this great plugin.
Save yourself time with quicker access to your WooCommerce Shop Resources with ‘WooCommerce admin bar addition’, helping you to manage your site with extra resources added to the tool and admin bar.
WooCommerce Admin Bar Addition
Keep yourself up to date on the finances of your store with up to date emails as often as you like
Eggemplo we give thanks to you for this one.
Choose the frequency, report and destination emails to stay up-to-date with all of your WooCommerce finances with this simple, yet succinct plugin.
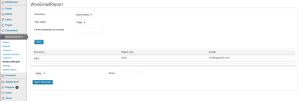
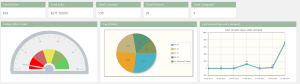
Make smart sales decisions with summary reports each month with the easy and intuitive WooCommerce Sales MIS Report plugin
Thank you Infosoft consultant for this.
View all key sales information in one main dashboard with this easy to understand plugin at a quick glance. You can view the previous months Summary Reports like Total Order, Recent Orders, Order Status and Order Summary.
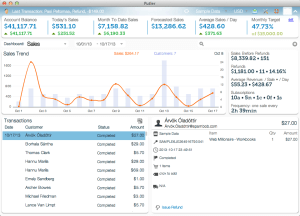
Data collection made easy with Putler with refunds, subscription management and more thrown in too!
Thanks Putler for this one.
Putler is a fantastic extension that collects transactions from different payment gateways and shopping carts, processes this data and then shows you useful statistics, charts and details. Putler can also issue refunds, manage subscriptions and work at speed even while offline!
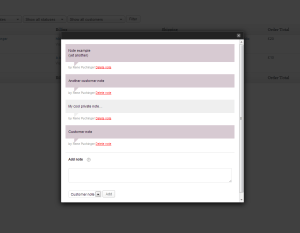
Override the order notes icon with the content of the order notes meta box
Thank you to Rene Puchinger for developing this one for us to share.
Currently, when a user navigates to WooCommerce > Orders and clicks on Order Notes icon, it opens the order itself. By using the WooCommerce Order Notes Window plugin you can override the default functionality when clicking on Order notes button so that modal window with order notes is displayed instantly.
I must however note that this plugin is currently for the use of WooCommerce 2.0x only.
WooCommerce Order Notes Window
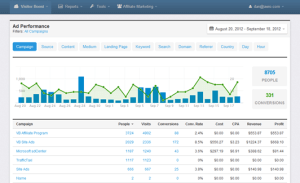
Measure advertising, click fraud marketing, social media marketing and SEO results..for all your tracking and monitoring needs really!
Thank you Improvely for this lovely extension.
Try a free trial of ‘Improvely for WooCommerce’ and become a smarter store owner! Improvely tracks all the data on how users got to your site, the search the typed into Google or ad without asking them.
With a track of every visit to your site and 30 online reports you can slice and dice all your web traffic by landing page, search engine, ad campaign and more!
This free trial lasts for 14 days and all you need is WooCommerce, an Improvely account and about 60 seconds, after that plans start from as little as around £20.
Set new orders with sequential order numbers
We thank SkyVerge for this little gem.
The ‘WooCommerce Sequential Order Numbers’ plugin is a simple but handy little tool that does the numbering for you!
WooCommerce Sequential Order Numbers
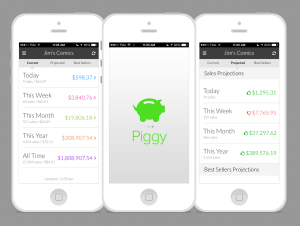
Get real-time sales figures wherever you are
Thank you BraveNewCode Inc for this one.
Piggy is a mobile sales statistics that allows you to access real-time sales and projections on your phone or tablet, so now you can ‘keep tabs’ no matter where you are!
Misc
Hiding the breadcrumbs from the Home/front page
Thanks WordPress support team for this.
.home .breadcrumb { display:none; }
Fine-tuning your shop with an array of tools on your ‘Swiss knife’ through this valuable ‘Poor guys Swiss Knife’ plugin
Thank you to TakeBarcelona for this.
WooCommerce Poor Guys Swiss Knife allows you to really ‘open up your swiss knife’ on WooCommerce with features that include fine-tuning your shop, customising your checkout forms and adapting your shop for country specific needs.
WooCommerce Poor Guys Swiss Knife
Display category image on category archive
Thank you Woothemes documentation for this snippet.
| add_action( ‘woocommerce_archive_description’, ‘woocommerce_category_image’, 2 ); |
| function woocommerce_category_image() { |
| if ( is_product_category() ){ |
| global $wp_query; |
| $cat = $wp_query->get_queried_object(); |
| $thumbnail_id = get_woocommerce_term_meta( $cat->term_id, ‘thumbnail_id’, true ); |
| $image = wp_get_attachment_url( $thumbnail_id ); |
| if ( $image ) { |
| echo ‘<img src=”‘ . $image . ‘” alt=”‘ . $cat->name . ‘” />’; |
| } |
| } |
| } |
view rawfunctions.php hosted with
by GitHub
Work smarter with Smart Manager for e-Commerce, a unique plugin that allows you to manage products, product variations, customers and orders efficiently
We want to thank Store Apps for this one.
The ‘Smart Manager for e-Commerce – WooCommerce and WPeC extension’ plugin allows you to efficiently manage your e-commerce site with a familiar, single page, spreadsheet like interface.
Smart Manager for e-Commerce – WooCommerce and WPeC extension
Allow customers a close up with the ability to zoom in on products
Thank you YIThemes for this lovely extra.
Add a zoom effect on images when customers hang their cursor over the product using this great little plugin ‘YITH WooCommerce Zoom Magnifier’.
YITH WooCommerce Zoom Magnifier
Tell your customers exactly how much they’re saving with a sale badge you can customise
Thank you Hugh Lashbrooke for developing this so that we can pass it on!
Enhances the built-in sale badge by displaying the total saving amount a customer will receive. This simple but effective plugin works with all the WooCommerce product types and allows you to display ‘Save **’ badges as well as ‘Save up to $X!’ on variable and grouped products.
Change a widget title
Thank you Remi Corson @ WPExplorer for your snippet here.
/*
* Change widget title
*/
add_filter( 'widget_title', 'woo_widget_title', 10, 3);
function woo_widget_title( $title, $instance, $id_base ) {
if( 'onsale' == $id_base) {
return "My new title";
}
}
Give users instant and changing predictive results as search whilst showing them the product thumbnail, product title and description
Thanks a3rev for this one.
With accurate results, WooCommerce Predictive Search is a great plugin that will query your entire product database upon a search. You can also exclude Products from Predictive Search, set the number of Product results to show in the drop down and more.
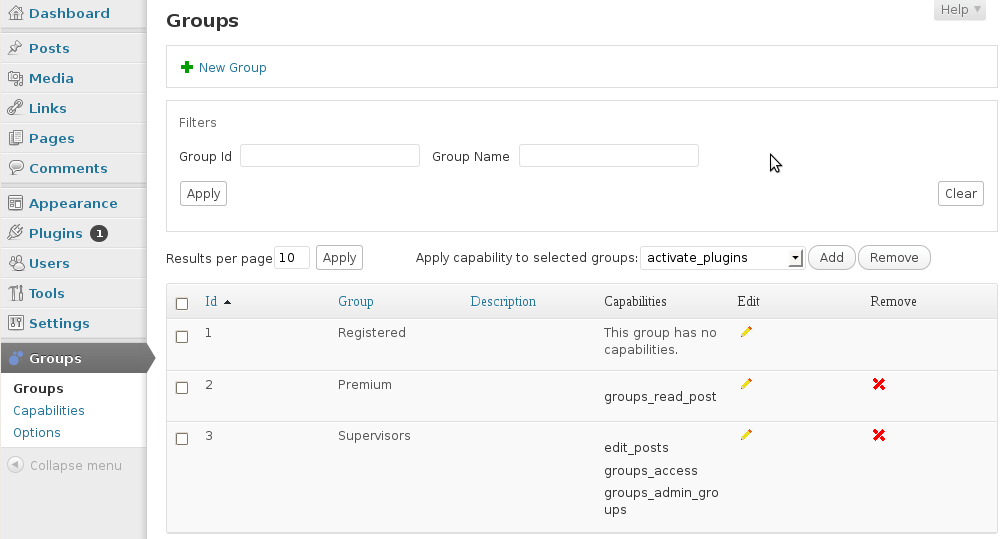
Create a flexible group-oriented membership program to your e-commerce site with ‘Groups’
Itthinx we give you our thanks for this.
‘Groups’ provides a powerful tool that allows you to create group-based user membership management, group-based capabilities and content access control.
Create a dynamic image gallery
‘WooCommerce Dynamic Gallery’ plugin does what it says on the tin!
Add a background image to the shop page only
I’m sorry I don’t know where I found this but thank you if it’s from you!
| add_filter( ‘wp_head’, ‘wo_custom_shop_background’ ); |
| function wo_custom_shop_background() { |
| if( is_shop() && !is_admin() ) { |
| ?> |
| <style> |
| body { |
| background: url(http://blogs.smithsonianmag.com/smartnews/files/2013/08/06177001.jpg) no-repeat center center fixed; |
| -webkit-background-size: cover; |
| -moz-background-size: cover; |
| -o-background-size: cover; |
| background-size: cover; |
| } |
| </style> |
| <?php |
| } |
| } |
view rawAdd a background image to the shop page only in WooCommerce hosted with
by GitHub
Over 250 free eCommerce based icons are available to download from the awesome Freepik to add across your store
A massive thanks to Freepik and WooThemes for providing this.
Download the Freepik eCommerce icon pack with over 250 free icons here.

So you want to link up your ‘shop on the ground’ with your WooCommerce store?
Thank you to the awesome legend that is Chris Lema for this.
In this step by step guide, Chris Lema takes you through how you can acheive making your WooCommerce online store support offline transactions. His tutorial does use the extension ‘Local Pickup Plus’ which will set you back around £50 (£47 to be precise), but this is a small price to pay for the outcome you achieve.
Check out Chris Lema’s ‘Offline Transactions’ Tutorial here
Want to try out WooCommerce with a WooTheme? Here are 5 FREE (yes, we said free!) WooCommerce-enabled themes to host your store on!
Thank you WooThemes you awesome lot!
Have a little look at this blog post for 5 of WooThemes FREE themes to host your WooCommerce store from:
View and download the 5 free themes here
Tracking using Google Analytics alongside your WooCommerce store and Paypal using this smooth and easy guide
Thank you Works Media for this great bit of advice.
Find out how to make WooCommerce work with Google Analytics goal tracking and Paypal to monitor conversions within Analytics with this great step-by-step guide:
WooCommerce Goal Tracking With Google Analytics and Paypal Step-by-step Guide
Add sharing buttons and track sharing activity from networks like Facebook and Twitter
Thanks AddShoppers for this.
‘Sharing Buttons & Analytics by AddShoppers’ is a plugin to do exactly that!

Need some inspiration!?
Thank you WooThemes for sharing these.
Want to see just how awesome your site could look using WooCommerce? Then check out some of the customers stories as well as a showcase for some inspiration that will leave you itching to get going!
An example of a site using WooCommerce from the Customers stories
The Woo Showcase Check this link as was not working when last tried 19/4/14
Add extra fields, such as ‘pending’ or ‘on hold’ to the status of a customers order
Thank you Remi on WPExplorer for this tutorial.
Want to mark a customers order as ‘on-hold’ or ‘refunded’? Then here is a really great tutorial on how to create extra options for the status of a customers order. With a little bit of code-tweaking, you are taken step-by-step through how to do it with all the code included.

The result of adding extra fields to the customer order status.
Create WooCommerce Customer Order Status Extra Fields
Import your WooCommerce shop to Facebook with the leading social commerce platform plugin ‘WooCommerce shop to Facebook’
Our thanks go to Storeya for this plugin.
With this awesome and super useful plugin you can import your WooCommerce shop to facebook in a matter of minutes creating a store that fits within Facebook but still has your brands look and ‘feel’. There are also loads of great features such as tabs to Pintrest, Twitter and YouTube, as well as ‘Group deal’ which is a fantastic group deal to encourage friends to share and buy if you reach a certain number of users join (which you can specify)!

Get rid of the Returning Customer Info Box so that user registering functionality isn’t used with this little code trick
Thank you again to WordPress support and the great team behind it for this.
Simply hide the Returning Customer Info Box with this:
.woocommerce-info { display: none; }
Or alternatively use: